This chapter is taken from the book A Primer on Scientific Programming with Python by H. P. Langtangen, 5th edition, Springer, 2016.
Reading data from web pages
Python has a module urllib which makes it possible to read data from
a web page as easily as
we can read data from an ordinary file. (In principle this is
true, but in practice
the text in web pages tend to be much more complicated than the text
in the files we have treated so far.)
Before we do this, a few concepts from the Internet world must be touched.
About web pages
Web pages are viewed with a web browser. There are many browsers: Firefox, Internet Explorer, Safari, Opera, and Google Chrome to mention the most famous. Any web page you visit is associated with an address, usually something like
http://www.some.where.net/some/file.html
This type of web address is called
a URL (Uniform Resource Locator) or
URI (Uniform Resource Identifier).
(We stick to the term URL in this document because Python's tools for
accessing resources on the Internet have url as part of
module and function names.)
The graphics you see in a web browser, i.e., the web page you see with
your eyes, is produced by a series of commands that specifies
the text on the page, the images, buttons to be pressed, etc.
Roughly speaking, these commands are like statements in computer programs.
The commands are stored in a text file and follow rules in a language,
exactly as you are used to when writing statements in a programming language.
The common language for defining web pages is HTML. A web page is then simply a text file with text containing HTML commands. Instead of a physical file, the web page can also be the output text from a program. In that case the URL is the name of the program file.
Figure 4: Example of what a very simple HTML file looks like in a web browser.
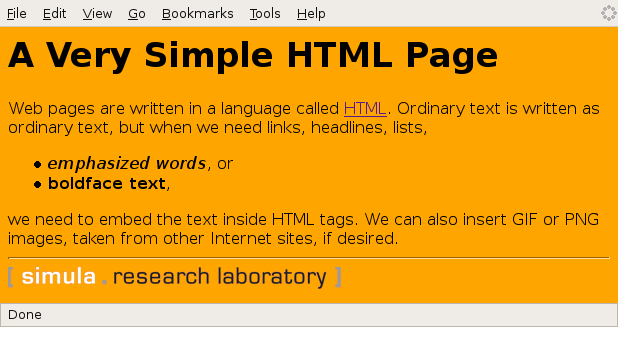
The web browser interprets the text and the HTML commands, and then decides how to display the information visually. Let us demonstrate this for a very simple web page shown in Figure 4. This page was produced by the following text with embedded HTML commands:
<html>
<body bgcolor="orange">
<h1>A Very Simple HTML Page</h1> <!-- headline -->
Web pages are written in a language called
<a href="http://www.w3.org/MarkUp/Guide/">HTML</a>.
Ordinary text is written as ordinary text, but when we
need links, headlines, lists,
<ul>
<li><em>emphasized words</em>, or
<li> <b>boldface text</b>,
</ul>
we need to embed the text inside HTML tags. We can also
insert GIF or PNG images, taken from other Internet sites,
if desired.
<hr> <!-- horizontal line -->
<img src="http://www.simula.no/simula_logo.gif">
</body>
</html>
A typical HTML command consists of an opening and a closing tag.
For example, emphasized text is specified by enclosing the text
inside em (emphasize) tags:
<em>emphasized words</em>
The opening tag is enclosed in less than and greater than signs, while the closing tag has an additional forward slash before the tag name.
In the HTML file we see an opening and closing html tag around the
whole text in the file. Similarly, there is a pair of body tags,
where the first one also has a parameter bgcolor which can be used
to specify a background color in the web page. Section headlines are
specified by enclosing the headline text inside h1 tags. Subsection
headlines apply h2 tags, which results in a smaller font compared
with h1 tags. Comments appear inside <!-- and -->. Links to
other web pages are written inside a tags, with an argument href
for the link's web address. Lists apply the ul (unordered list)
tag, while each item is written with just an opening tag li (list
item), but no closing tag is necessary. Images are also specified with
just an opening tag having name img, and the image file is given as
a file name or URL of a file, enclosed in double quotes, as the src
parameter.
The ultra-quick HTML course in the previous paragraphs gives a glimpse of how web pages can be constructed. One can either write the HTML file by hand in a pure text editor, or one can use programs such as Dream Weaver to help design the page graphically in a user-friendly environment, and then the program can automatically generate the right HTML syntax in files.
How to access web pages in programs
Why is it useful to know some HTML and how web pages are constructed? The reason is that the web is full of information that we can get access to through programs and use in new contexts. What we can get access to is not the visual web page you see, but the underlying HTML file. The information you see on the screen appear in text form in the HTML file, and by extracting text, we can get hold of the text's information in a program.
Given the URL as a string stored in a variable, there are two ways of accessing the HTML text in a Python program:
Alternative 1
Download the HTML file and store it as a local file with a given name,
say webpage.html:
import urllib
url = 'http://www.simula.no/research/scientific/cbc'
urllib.urlretrieve(url, filename='webpage.html')
Alternative 2
Open the HTML file as a file-like object:
infile = urllib.urlopen(url)
This infile object has methods such as read, readline, and
readlines.
Example: Reading pure text files
Some web pages are just pure text files. Extracting the data from such pages are as easy as reading ordinary text files. Here is an example of historic weather data from the UK:
http://www.metoffice.gov.uk/climate/uk/stationdata/
We may choose a station, say Oxford, which directs us to the page
http://www.metoffice.gov.uk/climate/uk/stationdata/oxforddata.txt
We can download this data file by
import urllib
url = \
'http://www.metoffice.gov.uk/climate/uk/stationdata/oxforddata.txt'
urllib.urlretrieve(url, filename='Oxford.txt')
The files looks as follows:
Oxford
Location: 4509E 2072N, 63 metres amsl
Estimated data is marked with a * after the value.
Missing data (more than 2 days missing in month) is marked by  ---.
Sunshine data taken from an automatic ...
   yyyy  mm   tmax    tmin      af    rain     sun
              degC    degC    days      mm   hours
   1853   1    8.4     2.7       4    62.8     ---
   1853   2    3.2    -1.8      19    29.3     ---
   1853   3    7.7    -0.6      20    25.9     ---
   1853   4   12.6     4.5       0    60.1     ---
   1853   5   16.8     6.1       0    59.5     ---

...

   2010   1    4.7    -1.0      17    56.4    68.2
   2010   2    7.1     1.3       7    79.8    59.3
   2010   3   11.3     3.2       8    47.6   130.2
   2010   4   15.8     4.9       0    25.5   209.5
   2010   5   17.6     7.3       0    28.6   207.4
   2010   6   23.0    11.1       0    34.5   230.5
   2010   7   23.3*   14.1*      0*   24.4*  184.4*  Provisional
   2010   8   21.4    12.0       0   146.2   123.8   Provisional
   2010   9   19.0    10.0       0    48.1   118.6   Provisional
   2010  10   14.6     7.4       2    43.5   128.8   Provisional
After the 7 header lines the data consists of 7 or 8 columns of
numbers, the 8th being of no interest.
Some numbers may have * or # appended to them,
but this character must be stripped off before using the number.
The columns contain the year, the month number (1-12), average maximum
temperature, average minimum temperature, total number of days of
air frost (af) during the month,
total rainfall during the month, and the total number
of hours with sun during the month. The temperature averages are taken
over the maximum and minimum temperatures for all days in the month.
Unavailable data are marked by three dashes.
The data can be conveniently stored in a dictionary with, e.g., three main keys: place (name), location (the info on the 2nd), and data. The latter is a dictionary with two keys: year and month.
The following program creates the data dictionary:
infile = open(local_file, 'r')
data = {}
data['place'] = infile.readline().strip()
data['location'] = infile.readline().strip()
# Skip the next 5 lines
for i in range(5):
    infile.readline()

data['data'] ={}
for line in infile:
    columns = line.split()

    year = int(columns[0])
    month = int(columns[1])

    if columns[-1] == 'Provisional':
        del columns[-1]
    for i in range(2, len(columns)):
        if columns[i] == '---':
            columns[i] = None
        elif columns[i][-1] == '*' or columns[i][-1] == '#':
            # Strip off trailing character
            columns[i] = float(columns[i][:-1])
        else:
            columns[i] = float(columns[i])

    tmax, tmin, air_frost, rain, sun = columns[2:]

    if not year in data['data']:
        data['data'][year] = {}
    data['data'][year][month] = {'tmax': tmax,
                                 'tmin': tmin,
                                 'air frost': air_frost,
                                 'sun': sun}
The code is available in the file historic_weather.py.
With a few lines of code, we can extract the data we want, say a two-dimensional array of the number of sun hours in a month (these data are available from year 1929):
sun = [[data['data'][y][m]['sun'] for m in range(1,13)] \
       for y in range(1929, 2010)]
import numpy as np
sun = np.array(sun)
Example: Extracting data from HTML
Very often, interesting data in a web page appear inside HTML code. We then need to interpret the text using string operations and store the data in variables. An example will clarify the principle.
The web site www.worldclimate.com contains data on temperature and
rainfall in a large number of cities around the world.
For example,
http://www.worldclimate.com/cgi-bin/data.pl?ref=N38W009+2100+08535W
contains a table of the average rainfall for each month of the year in the town Lisbon, Portugal. Our task is to download this web page and extract the tabular data (rainfall per month) in a list.
Downloading the file is done with urllib as explained in
the sections How to access web pages in programs and Example: Reading pure text files.
Before attempting to read and interpret the text in the file, we need
to look at the HTML code to find the interesting parts and determine
how we can extract the data.
The table with the rainfall data appears in the middle of the file.
A sketch of the relevant HTML code goes as follows:
<p>Weather station <strong>LISBOA</strong> ...
<tr><th align=right><th>  Jan<th>  Feb<th> ... <br>
<tr><td> mm <td align=right> 95.2 <td align=right> 86.7 ...<br>
<tr><td>inches <td align=right>3.7<td align=right>3.4 ...<br>
Our task is to walk through the file line by line and stop for processing the first and third line above:
infile = open('Lisbon_rainfall.html', 'r')
rainfall = []
for line in infile:
    if 'Weather station' in line:
        station = line.split('</strong>')[0].split('<strong>')[1]
    if '<td> mm <td' in line:
        data = line.split('<td align=right>')
The resulting data list looks like
['<tr><td> mm ', ' 95.2 ', ..., '702.4<br> \n']
To process this list further, we strip off the <br>... part of
the last element:
data[-1] = data[-1].split('<br>')[0]
Then we drop the first element and convert the others to float
objects:
data = [float(x) for x in data[1:]]
Now we have the rainfall data for each month as a list of real numbers. The complete program appears in the file Lisbon_rainfall.py. The recipe provided in this example can be used to interpret many other types of web pages where HTML code and data are wired together.
Handling non-English text
By default, Python only accepts English characters in a program file. Comments and strings in other languages, containing non-English characters, requires a special comment line before any non-English characters appears:
# -*- coding: utf-8 -*-
This line specifies that the file applies the UTF-8 encoding. Alternative encodings are UTF-16 and latin-1, depending on what your computer system supports. UTF-8 is most common nowadays.
There are two types of strings in Python: plain strings (known as
byte strings) with type str
and unicode strings with type unicode. Plain strings suffice as long
as you are writing English text only. A string is then just a
series of bytes representing integers between 0 and 255.
The first characters corresponding to the numbers 0 to 127 constitute
the ASCII set. These can be printed out:
for i in range(0, 128):
    print i, chr(i)
The keys on an English keyboard can be recognized from i=32 to i=126.
The next numbers are used to represent non-English characters.
Texts with non-English
characters are recommended to be represented by unicode strings.
This is the default string type in Python 3, while in Python
2 we need to explicitly annotate a string as unicode by
a u prefix as in s = u'my text'.
We shall now explore plain strings and unicode strings and will for that purpose need a help function for displaying a string in the terminal window, printing the type of string, dumping the exact content of the string, and telling us the length of the string in bytes:
def check(s):
    print '%s, %s: %s (%d)' % \
          (s, s.__class__.__name__, repr(s), len(s))
Let us start with a German character typed with a German keyboard:
>>> Gauss = 'C. F. Gauß'
>>> check(Gauss)
C. F. Gauß, str: 'C. F. Gau\xc3\x9f' (11)
Observe that there are 10 characters in the string, but len(Gauss)
is 11. We can write each character:
>>> for char in Gauss:
...     print ord(char),
...
67 46 32 70 46 32 71 97 117 195 159
The last character in the Gauss object, the special German character,
is represented
by two bytes: 195 and 159. The other characters are in the
range 0-127.
The Gauss object above is a plain Python 2 (byte) string. We can define
the string as unicode in Python 2:
>>> Gauss = u'C. F. Gauß'
>>> check(Gauss)
C. F. Gauß, unicode: u'C. F. Gau\xdf' (10)
This time the unicode representation is as long as the expected number
of characters, and the special German ß looks like \xdf.
In fact, this character has unicode representation
DF and we can use this code directly
when we define the string, instead of a German keyboard:
>>> Gauss = u'C. F. Gau\xdf'
>>> check(Gauss)
C. F. Gauß, unicode: u'C. F. Gau\xdf' (10)
The string can be defined through the UTF-8 bytecode counterpart to ß, which is C3 9F:
>>> Gauss = 'C. F. Gau\xc3\x9f'  # plain string
>>> check(Gauss)
C. F. Gauß, str: 'C. F. Gau\xc3\x9f' (11)
Mixing UTF-8 bytecode in unicode strings, as in u'C. F. Gau\xc3\x9f',
gives and unreadable output.
We can convert from a unicode representation to UTF-8 bytecode and back again:
>>> Gauss = u'C. F. Gau\xdf'
>>> repr(Gauss.encode('utf-8'))  # convert to UTF-8 bytecode
'C. F. Gau\xc3\x9f'
>>> unicode(Gauss.encode('utf-8'), 'utf-8')  # convert back again
u'C. F. Gau\xdf'
Other encodings are UTF-16 and latin-1:
>>> repr(Gauss.encode('utf-16'))
'\xff\xfeC\x00.\x00 \x00F\x00.\x00 \x00G\x00a\x00u\x00\xdf\x00'
>>> repr(Gauss.encode('latin-1'))
'C. F. Gau\xdf'
Writing the unicode variable Gauss to file, a la f.write(Gauss),
leads to a UnicodeEncodeError in Python 2, saying that 'ascii'
codec can't encode character u'\xdf' in position 9. The UTF-8
bytecode representation of strings does not pose any problems with
file writing. The solution for unicode
strings is to use the codecs module and explicitly work with a
file object that converts unicode to UTF-8:
import codecs
with codecs.open('tmp.txt', 'w', 'utf-8') as f:
    f.write(Gauss)
This is not necessary with Python 3, so if you use non-English characters, Python 3 has a clear advantage over Python 2.
To summarize, non-English character can be input with a non-English keyboard and stored either as a plain (byte) string or as a unicode string:
>>> name = 'Åsmund Ødegård'  # plain string
>>> check(name)
Åsmund Ødegård, str: '\xc3\x85smund \xc3\x98deg\xc3\xa5rd' (17)
>>> name = u'Åsmund Ødegård' # unicode
>>> check(name)
Åsmund Ødegård, unicode: u'\xc5smund \xd8deg\xe5rd' (14)
Alternatively, the non-English characters can be specified with special codes, depending on whether the representation is a plain UTF-8 string or a unicode string. Using a table with conversion between unicode and UTF-8 representation we find that in UTF-8, Å has the code C3 85, Ø is C3 98, and å is C3 A5:
>>> name = '\xc3\x85smund \xc3\x98deg\xc3\xa5rd'
>>> check(name)
Åsmund Ødegård, str: '\xc3\x85smund \xc3\x98deg\xc3\xa5rd' (17)
In unicode, Å is C5, Ø is D8, å is E5:
>>> name = u'\xc5smund \xd8deg\xe5rd'
>>> check(name)
Åsmund Ødegård, unicode: u'\xc5smund \xd8deg\xe5rd' (14)
The examples above have been collected in the file unicode_utf8.py.